Automatic Login or Login Macro function – Have you ever wanted to make the PuTTY login session automatic?
PuTTY is a great free telnet ssh client and I wouldn’t trade with any other client. But it lacks of this minor function that I really want – Automatic login.
Maybe the automatic login is not a big deal. You can just type in the userid and the password each time you log in to the development server . But if you do that regularly everyday, opening several times throughout the whole day, you would understand and agree with my little wish.
So I been looking for the solution , going through the every results of the Google search.
And here is the great helper application that can do automatic login macro!
PuTTY Connection Manager (http://puttycm.free.fr/) is the great .NET 2.0 application that can do the automatic login. Moreover, it supports tabbed windows just like the Firefox does it. Also it has quick connection menu bar that you just type in the address and connect which can be also useful.
Features
- Tabs and dockable windows for PuTTY instances.
- Able to load the profiles created from PuTTY.
- Login macro – You can define Userid and Password and extra commands to execute after login.
Requirements
- Microsoft .NET Framework 2.0
- PuTTY ( download from here http://www.chiark.greenend.org.uk/~sgtatham/putty/download.html)
It can be little confusing when you first use the software and to use that Login Macro. By default the PuTTY CM shows existing PuTTY Session profiles in the TreeView located in the right pane. Don’t be fooled, you cannot set Login Macro with the existing PuTTY Session profiles. You will need to create a new database to do that.
- Create a new database from File menu.
- You will see the newly created database icon in the right pane, above the PuTTY Session item. Copy the profile you want to set Login macro from the PuTTY Sessions and paste into the new database you just created. You can use traditional ctrl+C and ctrl+V shortcut.
- Right mouse click on the newly created item under the database and select Configuration.
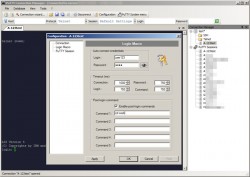
- A new window dialog will show up with the same connection information as the original PuTTY profile. Check on the “Enable Login Macro Mode”.
- Select “Login Macro” in the left TreeView and you will be able to define the userid ,password, timeout seconds, and post login commands.
- After inputting data, click on the OK button and connect by double clicking the item.
Also, don’t forget to save your database settings, so you can use the settings later on.
Come visit again for more information on PuTTY Automation.


