 Few years ago, I was looking for some free streaming video service solutions for my website, but couldn’t find any. There was Media Streaming Server from Microsoft, but I am using LINUX. Eventually I gave up searching that I lost interest.
But now that many movie sharing web sites are using Flash Video ( files extension .flv) I decided to take some time to learn how to embed streaming video to a website using Freewares.
Flash Video is a technology that supports streaming video naturally using Adobe Flash Player. You do not need to buy that expensive streaming media server for this. Users do require to install Adobe Flash Player in their computer in order to view this Flash videos. But most of the casual users already have the Flash installed so don’t worry. You can learn all about the Flash Video technology at Flash Video Wikipedia.
Note that if you are looking for an easy solution, you should think about utilizing sharing services such as YouTube. It’s a great service that you can upload regular movie files – such as .avi, .wmv – and it will be automatically converted to flash video. Once you upload your movie, you will get little html <embed> code snippets that you can insert to your web page.
This approach is probably more common and better if you just need to add some videos with out too much hassle. Also, this is important. The streaming data is directly coming from the YouTube server to the users’ web browser, therefore it does not consume your web server’s bandwitdh at all! That’s a big relief if you are using cheap hosting service with very small bandwidth limit.
However, YouTube’s video quality is low(320X240). Even if your original video data is high quality , it will be converted to low quality during the data upload. Of course, this is to save some bandwidth for YouTube and I do understand. (By the way, I heard that there is a little hack that you can see higher resolution from YouTube. See here for the details)
If you want better resolution than 320X240 and/or if you do not want to “YouTube” logo showing in the flash player, you can continue reading my article.
So my instruction is how to create and add Flash video to your website. And note that this will result high bandwidth usage charge from your ISP since the Stream data will be coming from your web server to the users’ web browser. If your hosting service package’s bandwidth usage is unlimited, you can go head and set this up happily. 😉
Now there will be two tasks involved in my instruction.
- How to create a FLV file.
- How to setting up Streaming Flash Video Player in your web server and WordPress.
1. How to create a Flash video file?
First, you will need to convert your existing video file to Flash Video format (.flv extension)
There are virtually too many video related softwares out there in the Internet. Most of them are shareware and probably there would be limitations. So I searched for the Freeware version of this AVI , WMV to FLV conversion software.
I have tried several to-FLV conversion softwares, but this I guess this software does it for me.
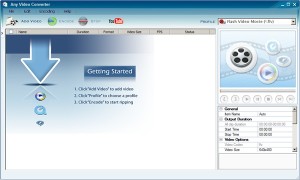
Any Video Converter has a very slick interface for a Freeware. In fact , it is very powerful that not even AVI, WMV to FLV conversion, you can do almost any convertion interchangably between DVD, AVI, WMV, MPEG, MP4 and FLV. I would not ask for more. Also it has a capability to convert video from YouTube directly and store it in to local hard drive in the format you want.
Anyway, I am going to explain how to convert a video file to FLV.

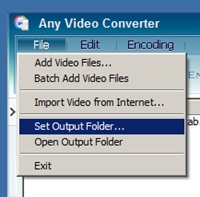
After you first install the software, the first thing you want to do is to set the default output folder.
Click on the File menu and select ‘Set Output Folder…’ menu to set it up. This is important folder because otherwise Any Video Converter does not alert the output file information whenever you convert the files. So when the conversion is completed , you just know that the output files are located in this output folder.

- Drag and Drop Source data. Then the file will be listed in the screen. Select the video file by clicking on it.
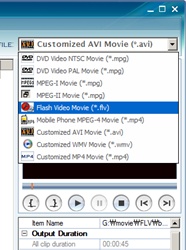
- Select the output video format. You can also select the specific length to convert , and data quality and size of the output video. However the function to define the range is kind of unstable. When I tried it, the output file contained different portion of the video from what I defined.
- Click on the ENCODE button and wait for the conversion to be finished.
- Check the default output folder you defined for the converted output files.
That is pretty easy right? I like the software. I give 8 out of 10 because , it asks a question to try pro version whenever you complete a conversion.
Also please see my other article on the Video format converter, if you are looking for more options.
This is getting long , so I will come back later to finish the “How to setting up Streaming Flash Video Player in your web server and WordPress” part.
Before I let you go, see below for the resolution comparison.
This is FLV Flash Movie file in my server converted from WMV format. The original resolution remains the same. 600X480 and the video quality is much better than YouTube which is 320X240.
This is YouTube.
Thank you for reading my blog. Please come back for more on “How to add Streaming Video in your website” later.
Have a good one.
Next : How to add Streaming Video in your website 2 – embed Flash Video Player
One thought on “How to add Streaming Video in your website 1 – create a Flash Video FLV”